How to connect wireless microphone to karaoke system – no more difficulty in karaoke setup
If there is a plan to host a karaoke night at home there are few details which need to get right if theirs is a thought on how to connect wireless microphone to karaoke system. It initially appears to be best option to use the screen for free karaoke videos on YouTube and to connect the microphones into speakers, but after trying to connect things, it does become apparent that there will be further steps.
Are you also wondering on how to connect wireless microphone to karaoke system? Do not worry. We got your back!
Let’s quickly go over what these systems are and how they operate before we configure how to connect wireless microphone to karaoke system. A wireless system essentially functions as a small radio station that takes the place of an instrument cord or a microphone connection. The receiver receives the signal from the transmitter through radio frequency (RF), processes it, and then provides the audio to the mixer. Because they provide artists more freedom, wireless devices are often used in settings like places of worship, fitness centres, sporting events, and concerts. By removing the need to utilise and connect several cables, they also conserve time and space. It has two parts- transmitter and receiver. The transmitter converts audio (AF) into radio frequency (RF), which is ultimately sent to the receiver. Receiver: It receives the radio signal, decodes it, and then feeds the audio signal to the input of your mixing board using an XLR or instrument cable.
- Let’s talk about setting up and using a wireless system. This will provide basic knowledge on how to connect wireless microphone to karaoke system.The setup process consists of these three basic steps:
- First you have to put the receiver in the right place.
- Then you have to Link the transmitter to the receiver.
- And then you can set the system’s volume.
The antenna and receiver installation should be done first when setting up a wireless system. Despite the fact that it is often advantageous to place the receiver close to the mixer, the “proper” location is any place where the transmitter will have a direct path to the receiver without any interruption by people, computers, racks of equipment, or anything else. Installing the antenna and receiver is simple if these directions are followed:-
- In order for the performer(s) to have a constant, direct line of sight to the receiver, the receiver should be placed at least 10 feet away from wireless consumer electronics such wireless computer routers and cell phones. Dropouts and audio blemishes like static and feedback will be reduced as a result.
- The antenna should be positioned and pointed upward. If the receiver has numerous antennas, arrange them such that they form a V shape at an angle.
- Turn on the receiver by connecting the output to an open input channel on the mixing board.
Location advice for antennas and receivers:-
- Verify that the antennas are directed upward and not outward toward the stage. Due to the antenna’s doughnut-shaped polar pattern, relatively little radio frequency will reach the transmitter if it is pointed straight out.
- Check to determine if any metallic objects are blocking the antenna(s), such as rack rails or metal cages, as this inhibits the radio waves from being sent out properly..
Make sure the antenna is positioned correctly and pointing in a V-shape
- The transmitter can be connected, then you can change the frequency.
- Make sure the wireless system’s frequency range is appropriate for use in that location before starting the pairing process. If you’re not sure what frequency range to use, use a wireless system frequency finder to make sure your devices are compatible.
- Next, pair the transmitter and receiver. To discover how to pair a device with a wireless system, consult the owner’s manual for that system. The precise wireless frequency is linked to frequency.
- By observing the receiver’s RF metre or LED, you may verify that the transmitter and receiver have been matched.
- The last step is to set the levels on transmitter, receiver and mixer.
So, How to connect wireless microphone to karaoke system ?
=>You are advised to take a wireless microphone system and follow some easy steps which will answer your question on how to connect wireless microphone to karaoke system :-
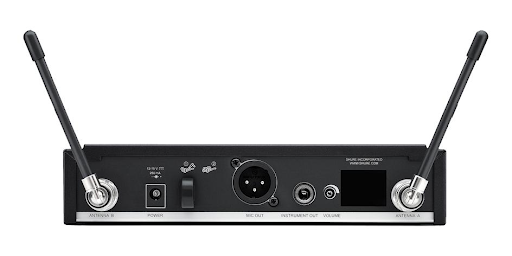
- In a receiver box we can see that it has power button , volume button ,two mic buttons where we can play with two microphones individually with their volume as well.
We have our treble, bass, echo, and music mix button where if we have an incoming source coming into the box we can adjust the level with that as well.
- Coming to our karaoke
We have our two antennas, a power card, bluetooth antenna.
We have our 3.5 input and our stereo quarter inch .
Left and right output and a 3.5 millimeter output.
Now, let us move on to the next steps on how to connect wireless microphone to karaoke system:-
- Lets take two antennas and connect it over by bending it and repeat this
- Take the power source and connect it to our power supply, now connect Bluetooth antenna here.(there is several ways we can connect this to actually get audio in a variety of ways)
- Now we are ready to connect the output of our box to the speakers.( We can use our pc speakers as well)
- Turn it on and we can hear the sound “ Bluetooth device is ready to pair” and it will connect to the Bluetooth device available.
- Take the microphone and connect it here
- Now we can play with the overall volume
Make sure to use long lasting power batteries .
- How to connect wireless microphone to karaoke system to a bigger screen (such as tv) ?
Following are the steps on how to connect wireless microphone to karaoke system in bigger screen :-
- Disconnect from our bluetooth
- We are going to use our optical port and connect it to our tv and have the audio from our tv being sent out so we use the optical cable that’s included with thr kit and again this kit has probably all the connections.
- Now as everything is connected we’re going to use our tv as our karaoke source.
We can connect our phone to the tv via an adaptor so we can mirror what’s happening on the phone.
Conclusion:-
Hopefully this article should have helped to clarify some things and provided with a few options for connecting microphone to device. You have to observe these few actions that We have already provided in the article before knowing how to connect wireless microphone to karaoke system for you :-
- Check the microphone’s connection type.
- Verify if this type of cable has an input connection on device.
- Connect them if you already have the cable available.
- If not, look through the links on Amazon to get one.
- Use an adaptor if they don’t have the same connector.